Seligor's Castle, fun for all the children of the world. Pastimes 4 U
KABOOSE has some simple things to make for the youngest ones watching. This is so you can give them the stuff needed so that you can carry on making something a little more adventurous.
HAS SOME MORE WONDERFUL THINGS FOR YOU TO MAKE
Kids will enjoy making this handy apron. All they have to do is dip their hands in paint and voilá, they've made a great
gift with their own "signature" on it.
Materials
Solid-colored apron
Fabric paints
Paper plates
Fabric pen
Instructions
Cover a work area with newspaper, and lay the apron right side up. Pour
a little paint into a paper plate.
Have kids press their hands in the paint, move them around until the
palm sides are covered, then place their handprints on the apron.
Continue until the apron is covered with prints.
Write each child's name with a fabric pen under his handprint. Let dry
for at least one day before wearing.
NORWAY: Cork Trolls
Epcot Fun Stop crafts from FamilyFun
Print
Share
Save Craft
Ancient
Norwegians believed that trolls with magical powers lurked among the
country's fjords and forests. Our simple cork troll also proved magical
at the Norway Kidcot Fun Stop, where kids from around the world made it
a runaway favorite. "Kids can relate to trolls," explains manager Scott
Pitts, "since most have heard or read the fable 'The Three Billy Goats
Gruff.'"
Materials
2 corks
Glue
Fun fur for hair
Felt, cloth or crepe paper for clothing
Yarn or string for belts
4 to 5 pompons for nose, hands and feet
2 googly eyes
Small bow-tie pasta for ears
Crepe paper for hat
Instructions
Glue one cork on top of the other, as shown, then glue on hair, clothes
and features using the materials listed.
To make the hats, apply glue around the top 1/2 inch of the cork, then
wrap a 1/2-inch edge of crepe paper around the glued area and gently
twist the opposite end. Finally, glue a pompon on top.
SELIGOR'S CASTLE
PAST-TIMES 4 U
THESE WONDERFUL NURSERY RHYME CHANGLINGS COME FROM
THE PARTY THEME SHOP.
THEY OFFER NOT ONLY EVERY KIND OF PARTY THEME STATIONARY BUT ALSO AN AMAZING AMOUNT OF FREE PRIN-TABLES FOR THE CHILDREN.
I'm afraid you will have to copy these onto a blank page in publisher before you can print them out here at Seligor's Castle. Others in the list are mentioned below.
Humpty Dumpty and the Egg. Tom the Piper's Son and His Pig
The Town Mouse and the Country MouseSilverhair and the Little Wee Bear
Robinson Crusoe and His ParrotThe Lion and the Unicorn
The Witch and Her Black CatNancy Netticoat and the Candle
Santa Claus and the Christmas TreeDick Whittington and His Cat
The Frog Who Would A-Wooing Go and the Lily White Duck
PASTIMES 4 U IN SELIGOR'S CASTLE
ANOTHER WINTER SNAP IS DUE ON THE 17TH DECEMBER, HERE ARE SOME FANTASTIC IDEA'S TO HELP KEEP THE FURRY AND FEATHERED FRIENDS WELL HEATED FROM THE INSIDE. I HAVE STILL THE COCONUT SHELLS SOMEWHERE ON THE PASTIMES 4U, HERE AND AT DREAMLAND. BUT THESE WHICH CAME FROM THE VERYBERRYHANDMADE SITE ARE VERY GOOD AND I DO BELIEVE EASIER FOR THE LITTLEST ONES TO HELP WITH.
MAGPIES, JACKDAWS AND ROOKS, ALSO JAYS LOVE POTATO SKINS AND VEG PEEL BOILED, AND PLACED ON THEIR OWN TABLE. I AM LUCKY TO HAVE A VERY BIG BACK GARDEN AND A LARGE FRONT ONE AND I HAVE SEVEN BIRD TABLES, AND I HAVE NO IDEA WHERE MY HUSBAND, PETER HAS OTHER THINGS SET UP.
TODAY ALL THREE OF MY LOCAL BUZZARDS CAME TO THE DEEP BACK, THEY USUALLY COME TO SEE IF THE FOXES HAVE LEFT ANY MEAT, BUT SADLY, I DO THINK THEY MAY TAKE THE OCCASIONAL SQUIRREL IF THERE ISN'T ANYTHING TO THEIR LIKING..
I HAVE A LOT OF GREY SQUIRRELS SO I MAKE PEANUT HOLDERS SPECIALLY FOR THEM WITH SOME OF THE COCONUT FLESH, IT DOES HELP KEEP THEM AWAY FROM ALL THE LITTLE BIRDS.
http://veryberryhandmade.wordpress.com/
Birdy Treats
Posted on December 11, 2010 by veryberryhandmade
If
you visit here regularly then you might have guessed that we are quite
keen on our beautiful garden birds. At this time of year we make really
sure to top up our feeders regularly, and we put water in their little
bath every day – which was even more necessary than usual in recent
freezing weather! The birds reward us, like all the best dinner party
guests, by sharing their company and entertaining us.
Just now regular visitors to our garden include blue tits, coal tits,
robins, blackbirds, wrens, goldfinches, great tits, dunnocks, magpies,
wood pigeons, collared doves & long-tailed tits. It’s only in the
last couple of years or so that we would have been able to identify
half of these, but we have learnt a lot, just standing at the kitchen
window & grabbing our bird book & we’ve also really enjoyed
reading and looking at the pictures in one of our favourite books – Birds Britannica
by Richard Mabey. We also try and take pictures sometimes – as you can
see from Sandy’s recent attempt to photograph a blue tit. He’s
definitely improving.
There is a brilliant summary of what/what not to feed birds on the RSPB’s website,
and as they suggest, at this time of year we like to make suet cakes
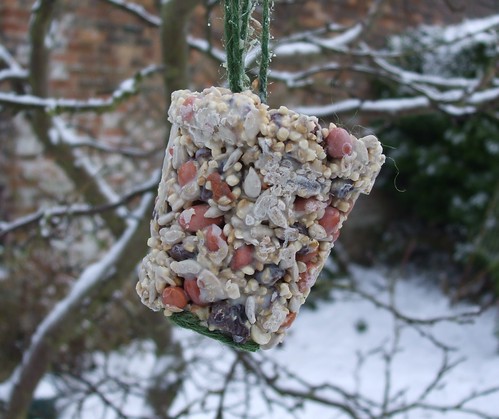
for our garden visitors.. As you can see from Sandy’s photo, they are
much appreciated by the small birds, especially as the larger birds
can’t manage to get at them (although they have a very good try!).
Here’s how we do it:
Suet Cakes for Birds
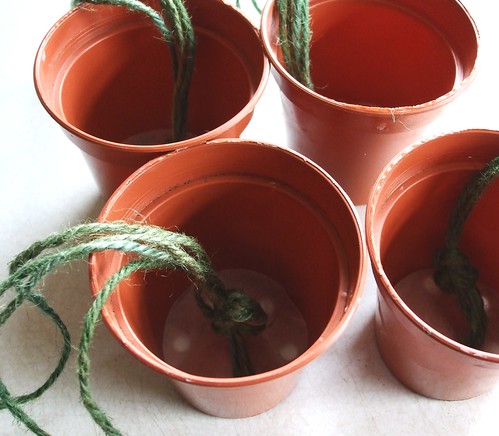
Prepare four 3″ plastic plant pots (i.e. plants pots that measure 3″
across the top) by washing them thoroughly, covering the holes in the
bottom with a circular piece of foil or greaseproof paper (wax circles
for jam making are just the right size!). Small yogurt pots would work
just as well.
Cut four 60cm lengths of garden twine & fold it in half twice, so
you have a little bundle of 4 strands, which you need to knot at the
bottom. I make 2 or 3 knots on top of each other to make a nice bulky
knot, then put the bundle of twine in the plant pot so that the knot
sits at the bottom (see picture).
Put one 200g packet of suet (not vegetarian!!!)or beef dripping in a pan over a
gentle heat to melt (a very gentle heat, you don’t want it to get too
hot otherwise it takes longer for the cakes to set).
Whilst the suet is melting weigh out 250g of good quality bird seed, 100g peanuts and 50g of raisins into a bowl.
Pour the warm melted suet over the dry ingredients and stir it all
up, and then use a spoon to transfer the mix to the 4 prepared pots –
try to keep the twine in the middle of the pot.
Use a teaspoon to squish down the mix – it really helps if the cakes are compact when you come to turn them out.
Put the 4 plant pots in the fridge to set quickly. When they are
quite hard, you should be able to turn them out by just giving the plant
pot a little squeeze. If they prove a bit stubborn, just run them
under warm water for a few seconds.
Then just take them outside and hang them up for the birds to enjoy.
If you are wondering where to get seed then I can really recommend the brilliant Wiggly Wigglers
– they have a wide range of feeds suitable for attracting different
kinds of birds to your garden, and lots of good advice too. If you are
feeling brave, you can order their live bird feed, but DO make sure that you fasten the bag securely after using, unless you want a load of lovely meal worms crawling around your garage, shed or (horrors) kitchen… You have been warned!
Here is a list of things that Seligor puts in her suet pots etc
WILD BIRD SEED. Extra Sunflower hearts, Crumbled Fruit Cake, Peanuts crushed, (Left whole for the Squirrel pots) Cheese - Cut very small. Extra Finch Seed. not too much barley or maize. It always seems to get left.
Raisins and Sultana's - try to wash and dry well to get rid of the juice, stops sticking.
I was wondering if it might be a good idea to somehow place a stick across the bottom of the pot to help the birds that don't naturally hang to feed better. My woodpeckers like to reach up whilst clinging onto something. so I usually wedge their food inside a fork in a branch. beware once more of dashed squigs. (Squirrels)
Many fishing/angling shops sell live meal worms and wiggles. Wrens like live food. and although you see the odd thrush on a bird table , most of the thrush/blackbird family do like to forage for their food on the ground. make sure you ask dad to help keep grassy areas cleared under bushes.
I am going to try very hard to make a video of my amazing garden. I was bought a flip camera for my birthday and if I can just stop my hands shaking I just might be able to do it for you all. The British Bird Organization have some wonderful idea's also.
Must go now, Time for bed. Seligor xxx xxx xxx xxx xxx xxx xxx xxx
SELIGOR'S CASTLE AND PAST-TIMES FOR YOU
Of course nothing would, or could be satisfied without the wonderful Kaboose Web Siteto help us with our fun and games.
We all know kids are little creative geniuses, always busy making up
their own games to satisfy their roaming imaginations and busy natures.
Still, they could use some ideas once in a while. Here are some backyard
games you can set up this summer.
Bean Bag Toss Make
an easy Bean Bag Toss using a double layer of poster board glued
together and a large box. Use the large box as a base, and attach the
poster board to one side of it. Before attaching the poster board, paint
a design on it, allowing for one or more holes. We never kept score,
but the kids had a lot of fun throwing those bean bags. They're easy to
make from fabric scraps if you sew. Get the kids to help.
Scavenger Hunt Hide
items in yard and have the kids try to find them. This can be as easy
or elaborate as you chose. Rather than encouraging competitiveness, have
the children work together to find all the items.
Duck, Duck, Goose Don’t
forget this classic although you need at least five friends to make
this game a lot of fun. Sit in a circle and have one child walk around
patting each child on the head saying, "Duck, duck, duck" and finally
"goose." The child deemed "goose" stands up and runs around the circle
in the opposite direction from the other child. Whoever gets back to the
spot and sits down first wins the spot and the other child starts again
with the "Duck, duck, goose."
There are very many more games and pastimes, here in Seligor's Castle. Do pop over to see them all, you will be most welcome. Seligor xxx
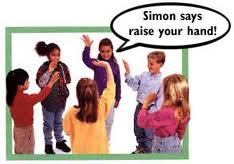
Simon Says An
oldie but a goodie. If your child has a favorite character, substitute
"Simon" with a character from the theme. Children should listen
carefully and only do what "Simon" says.
Charades Give
a child the theme or group of animals then have them act out what the
animal does. You and the kids can try to guess the name of the animal.
Freeze Tag One
child is chosen as being "it." The chosen child tags the other children
by catching up to them and touching them. Once tagged, the child must
remain frozen until another free child goes through their legs. When all
the children are frozen (except the one who was chosen as being "it")
with no one to set them free the game is over and you can start again.
Balloon Bust Relay Purchase
large balloons, stuff with a prize such as a whistle, then inflate and
tie. You will need one balloon for player. Divide children into two
teams and place each team behind the start line. At the other end of the
room are the balloons. On your mark a child from each team runs to the
other end of the room, grabs a balloon and sits on it, bounces on it,
lays on it, anything they can do to make it pop.
When the balloon pops they collect their prize and run back to their
teammates. The game continues until every child has retrieved their
prize. If one team falls behind parents are allowed to help. Make sure
you've got the movie camera rolling; you won't want to miss the action
or the expressions. If you don't have time for a relay yell, "GO" and
let every child grab a balloon at the same time and try to pop it.Make sure to carefully clean up the balloon remains, as they are choke hazards for young children.
Wits and Consequences Blow
up balloons with questions, written on strips of paper, inside and
place balloons in Bag "A". Let each guest reach in and pull out a
balloon on their turn. If they answer correctly they stay in the game
for another 'round, if they answer incorrectly they pull a balloon out
of Bag "B", pop it and have to do what it says..."Rub your tummy and pat
your head at the same time", "Strut and cluck like a chicken three
times". If they complete their task they can return to the game. If not
they can cheer on the remaining players. When all the questions have
been answered the games over.
Make sure to carefully clean up the balloon remains, as they are choke hazards for young children.
Kaboose.com
SELIGOR'S CASTLE ON THE SUBJECT OF Share VENTRILOQUISM!
The Question: First of all I should ask if any of you know what is ventriloquism, and who can BE a ventriloquist? The Answer: Well anybody really and the younger you start to learn the better you will become.
Ventriloquism is not, as many suppose, an art possible only to the few with special gifts; it can be practiced by most people who will follow certain well-defined rules, and try, try and try again, until you reach perfection. No particular structure of the vocal chords is necessary. A muffled vibration in the cavity of the mouth caused by the action of the tongue and lips produce a kind of whispering in which the words seem to be coming from a distance, and the illusion (for all good tricks have an illusion) is helped by the means of a doll/animal that has a moveable head and jaws. For it is the puppet that takes the attention away from the ventriloquist's mouth. One must stress here, that it is very necessary for the trainee ventriloquist to have a good set of teeth as the use of these is a definite piece of the ventriloquists equipment. And as good pair of lungs to hold enough air to keep you going.
A well known performer thus describes his way of speaking when he wishes to produce the illusion of a voice proceeding from a doll: "I press my tongue against my teeth, and thus produce a cavity between my left cheek and teeth, in which the voice is produced by the air left in the pharynx. The sounds thus receive a hollow and muffled tone which causes them to appear to come from a distance. It is essential to have the breath well under control, and not to breath out more than can be avoided. Practicing in front of a mirror is essential, so that you learn to control your jaw and mouth movements. (You don't want to look as if you are blowing up a balloon after all.) the point of this exercise is to produce elasticity in the vocal organs. The voice should never be strained: that is a mistake which many would be ventriloquists make. The powers must be developed quite naturally or hoarseness will result. (I am writing this down kids but I am not sure if I am understanding it all, I guess I will have to try along with you all!) The Most
important is the control of the mouth movements, as this is what
misleads the listeners to look away from you and at the dummy. You
will soon get to judge the distance of the sounds you are making, mainly
by comparing the ones we have already learnt. Like the dummy which is
still inside a suitcase, he must sound as if he is coming from farther
away and more muffled. is is mainly done by increasing or decreasing the loudness of the tones whilst still keeping the same pitch, quality and duration. Remember the rule, don't make your questions to long, or your answers, they must all come from that breath you are keeping in your throat. Also if the dolls mouth or beak moves, you will notice that the audience looks at it and not you. If the case is placed in the corner to your left. Turn that way, they will look at the case not you. as soon as the sound inside the case is heard, their attention will be on the case, always. Never try to rush things, one voice for one doll for one conversation. When you become really good at that voice then maybe you can add another, a girl and a boy. But don't forget which voice is which and always, always remember that all the voices are within you - and you must treat your voice with good food and good drink.
Dana's Ventriloquist & Magic Show
Children are you all paying attention? I do hope so! Okay then ask me who Dana Perkins is and what does he have to do with Ventriloquism? I will tell you - No better still, I will let him tell you all about himself and the wonderful work he does in helping children around the world.
Hello Children. My name is Dana Perkins and the photo on your left is of myself, (the one with glasses.) and three of my favourite characters.
For this program, I usually bring two footlockers, sometimes more of tricks, juggling, paper cutting and at least 3
of my ventriloquist puppets, including my giant bird puppet "Pee Wee Rainbow"
(almost 6' tall)! This is my most popular act and the children especially love Pee Wee Rainbow and always ask for more. I sometimes work on a stage but it isn't essential. When the weather is good it is really nice to have the show outside in the garden. But I must add if the show is for quite a large number of children, (not forgetting the mum's and dad's) it is best to have a stage or raised platform to do my act, that way everybody can see what is going on. My usual show last around 45 minutes long and is great for any size audience. Of course sometimes I will be asked for a special theme, this I can in most cases oblige, as I do have quite a few different tricks and voices. It also pleases me to say that I have been asked to do special
educational programs, which are available for public and private schools. I would like to add, if I may Seligor; that all of my shows are excellent family
entertainment for adults, teenagers and children ages 5 or older.
The actual puppets and tricks I use may vary according to the performing
conditions, and of course to the length of program and type of audience, and your own
particular requirements. I perform extensively
throughout New England at fairs, festivals, schools, churches, and
banquets for a wide variety of groups and organizations, so I will apologise now for all of the children who live too far away to come and see me. However this doesn't mean you can't come acoss on the airwaves and pop in to see what is happening here in the United States.
This next show, known as "Mr. Tricks," was
created for groups and organizations with smaller budgets, limited
performing areas, smaller audiences, or who simply want a smaller,
shorter show. The entire half hour programme fits into a single large
carrying case.
Mr. Tricks is a combination ventriloquist
and magic show that uses one smaller puppet (compared to my larger
show) as well as a variety of smaller tricks. Depending upon the nature
of your event and the age range of your audience, the show may include
juggling, balloon animals, trick paper cutting, etc. Mr. Tricks is a
great show when you need a "bit of entertainment" at the end of a
dinner or meeting, and it can easily be modified to become a birthday
party show for children.
And here I would like to thank Mr Perkins for his wonderful insight to the world of ventriloquism and magic tricks. I am sure all of you in the U.K. will remember the great Rodd Hull and his mu doll, would you belive called "Emu" Myself I do get a little frightened by the dolls or puppets, and my son Michael definitely doesn't lekt the "clown puppets," but I am sure if you were to ask the gentleman or lady not to use a particular puppet they will try very hard not to use them. Mr Perkins has other outside intrests and I think you should leave the castle for a moment and pop across the channel to New England, he he he. on line of course. Don't forget to come back via the return arrow back to Seligor. Just click on any of these links and you will find yourself with the wonderful world of Tricks and Ventriloquism with Mr Dana Perkins.
So you see children, with lots of practice you, yourself will be able to entertain your friends. Then as you get up more professional I am sure you will be entertaining the whole village.
CA Satyajit Padhye along with his Puppets in Grand Finale of India's Got Talent..
In the Finals of India's Got Talent, C.A. Satyajit Padhye performed
an act based on the theme of Global Warming.He performed with two
puppets, Chotu Singh and a bird puppet.He brought a Baby Puppet with
him also.The Baby Puppet interacted with Judge Sonali Bendre.Kirron
Kher told him that every performance of him is different & original
from all his previous performances.After Satyajit's performance was over he spontaneously commented on the anchors.
Satyajit also declared about his future plans on the show.He plans
to open an institute of Ventriloquism, Puppetry & Allied Arts which
will give a boost to the art of Ventriloquism & Puppetry.
Your little one will have fun crafting this snowman out of Styrofoam!
For more fun, be sure to visit our winter crafts, winter printables
and main winter index for more snowy ideas!
What you'll need:
Two and a half inch Styrofoam ball
Three inch Styrofoam ball
Four toothpicks
Two inch Styrofoam ball (Note: or use three balls in incremental sizes)
Mini black pom poms
Orange chenille stem (regular or bumpy)
Wire cutters
Tacky glue
Piece of ribbon or felt
Butter knife
How to make it:
Take a butter knife and even off the bottom of the largest Styrofoam ball. This will allow the snowman to stand up.
Push a toothpick halfway into the top of the largest Styrofoam ball (make sure the flat bottom is on the table).
Push the medium-sized Styrofoam ball onto the toothpick.
Push a toothpick a little more than halfway into the top of the
medium-sized Styrofoam ball. (Note: You don't want the toothpick
sticking out the top of the head!)
Push the smallest Styrofoam ball on top of the toothpick. This is the head.
Cut a short piece of orange chenille stem off for the nose. (Parents please do this step)
Push the nose into the middle of the (front) of the smallest Styrofoam ball.
Glue on pom pom eyes, mouth, and buttons.
Cut a strip of felt or ribbon for the scarf. Glue where the scarf
crosses both to the Styrofoam ball and to the other piece of scarf.
Stick two toothpicks in the middle-sized Styrofoam ball for the arms. (see photo)
How fun! Your own non-melting snowman!
Snow Family Finger Puppets
By: Amanda Formaro
Difficulty: Average
Age: 6 and up
Average User Rating:
This adorable snow family will give your kids hours of puppet time fun!
All you need are some inexpensive knit gloves and a few simple supplies
to put together this cute project.
What you'll need:
1 white knit glove
Hot glue gun
4 tiny orange pom poms
Small pom poms for ear muffs and hat
Chenille stem pieces
Scrap material
Scrap felt for scarves
Black acrylic paint
Paint brush
White felt
Scissors
Plastic wrap
How to make it:
Fill fingers of glove with plastic wrap. This will keep the glove
from sticking to itself from the glue and will act as a “filled finger”
which allows for a good fit when done.
Glue on chenille stems and pom poms for ear muffs.
Use a triangle shaped scrap of felt to form a simple hat. Wrap the
wide piece around the bottom and fold down the point to the back, then
glue in place. Glue a pom pom on top.
Use scrap material to make a wrap around shawl. Simply glue the
center of a long strip of material to the top of the “head”, then wrap
around and glue in place. Trim ends if needed.
Make scarves from felt strips, fringing the ends with scissors. Glue in place.
Glue orange pom poms on for noses.
Dip the handle end of a small paint brush into black acrylic paint.
Carefully dot on eyes and mouths. (Practice this step on the thumb
first if you plan to discard it the way that we did.
Allow everything to dry, then trim off the bottom of the glove and the thumb.
Glue a 1” wide strip of white felt around the bottom to keep it from fraying.
Carefully remove the plastic wrap from the fingers.
Put on hand and have a fun puppet show, these are so adorable and as the kids get used to making them you can create your own village community.
TIPS
Knit gloves are inexpensive (sometimes as £1.00 per pair)
and can be found at Tesco's or Ethel Austin's
If you have tiny black pom poms they can be used in place of paint
for the eyes and mouths. You can also practice with a black
marker. I used to use pieces of felt after a while it get easier to get them right.
Be careful when using hot glue guns because the hot glue can hurt
little hands. Always supervise or handle the gun yourself while
children position the materials. White craft glue can be used instead,
but takes a lot longer to dry. Again I have never possessed a glue gun, but I am very old and not used to these new things.
REMEMBER KIDS I HAVE PORTRAYED SNOWMEN AND WINTER, BUT LIKE WITH THE TRAY GARDENS, YOU CAN MAKE ANY SEASON OR ANY CHARACTER SCENE. WHAT ABOUT ONE OF YOUR FAVOURITE TV CARTOON SERIES, "THE NIGHT GARDEN" OR THE PIGGY CREATURES. He He He
AND IN HERE YOU WILL FIND A FEW FANTASTIC LITTLE VIDEO'S ON HOW YOU CAN MAKE SOME GREAT THINGS OF YOUR OWN, FROM A FELT PIZZA TO A FORTUNE COOKIE.
PASTIMES 4 U
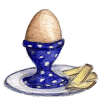
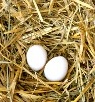
If the earth hatched from a giant egg, as the ancient Persians
believed, it might have resembled one of these in our dreamy dozen. We
used a simple dyeing technique to create the intricate swirls of color:
earthy brown twisting over baby blue, soft beige afloat on buttery
yellow. Every Easter egg made this way is one of a kind -- all are
enchanting.
Tools and Materials
Egg blower 12 eggs Several mixing bowls, shallow and deep Measuring spoons Liquid measuring cup White vinegar Food coloring Spoon and fork Olive oil Paper towels
How to Marbleizing
With
an egg blower, which is available at crafts stores, pierce the top and
bottom of each egg, puncturing the yolk; carefully expel the contents.
Rinse, and let dry.
1. In a small mixing bowl, combine 3 cups
warm water, 2 tablespoons vinegar, and 10 to 20 drops of food coloring.
Place egg in dye, and leave it submerged until it turns the desired
shade.
2. In a wide, shallow bowl, prepare a second batch of dye
-- which will provide the swirls -- in a darker shade or a different
color. Liquid should be no deeper than one half-inch. Add 1 tablespoon
olive oil. Run a fork through this mixture, creating curlicues of oil
on the surface.
3. As oil swirls, place dyed egg in mixture, and roll it once around the bowl to pick up oil streaks; remove the egg.
4. Gently pat egg with a paper towel.
5.
Let it dry. You can experiment with color combinations: Vary the base
tints and the swirls to achieve striking contrasts, subtle shadings, or
multihued richness.
I must thank the fantastic Martha Stewart for the use of her Expertees.
I like brown eggs far the best; Out of a brown old haystack nest, Under a brown hen, cosy, stout, With brown fowl hovering round about.
Long ago so I've been told, A goose laid eggs of purest gold. (Eggs of gold in a golden shell Mean none to eat, and all to sell!)
Eggs of gold would build a town, Eggs of gold would buy a crown, Buy a crown and make a king, And grant his lady anything!
I have brown eggs for my tea, Served in an egg-cup bought for me! So keep your gold and all the rest, I like brown eggs by far the best.
Revived on behalf of E. Fleming by Seligor. xxx
PASTIMES 4 U
Some wonderful clips for the kids, really over 5's I think
My little ones love some but not all, the skeleton one is very funny but a little scary. Take a look through them first. Diddily x x x
PASTIMES 4 U
Playtimes 4 U HOW TO MAKE A DIARY AND KEEP IT A SECRET
Can anyone tell me the name of the young girl who kept a diary all through the world war, she was very brave. Also a man called Samuel Peypes kept a diary which gave the history teachers lots of information about the Fire of London, amongst many other historical happenings.
The young lady was Anne Frank, but I am sure mum or dad would have told you already. xxx
1. Make sure that your diary is made especially for you. Don't leave it plain, cover it with some material or photos, material is better I think otherwise it just might be mistaken for a photo album and you don't want your diary falling under the wrong eyes.
2. You don't need to buy a book with every date in it, much better to get a blank pad and add the days when you find you have something exciting to write about. It can get a bit boring writing. "Today I got up. Nothing much happened. Went to bed 8pm." Now I ask you how uncool is that. Instead focus on the main points of the day. Did you go anywhere special? Did you make any new friends? A special Bo maybe!! How did you feel, etc.
3. What ever you do don't moan about your day, who would want to remember that. Unless you fell out with your best friend , or lost you purse.
4. Make sure you write nice, no scribbling and make it tidy every day.
5. Do remember that someone just might get to see your diary so try not to use the real names of anyone you might talk about. It would be awful if you wrote something awful about your friend that was, only to make it up and her read your diary and see the dreadfull things you may have written.
6. Most peoples diaries are kept somewhere safe, away from prying eyes.... not under your pillow or even the bed. The best place is in your bookcase amongst all your other books. Give it a false title like... Diddily's Book of Welsh Literature... it wont get many second looks that's for sure... not in England or America anyway.
THERE YOU GO 6 RULES FOR MAKING A LOVELY DIARY. HAVE FUN. SELIGOR. XXX
PASTIMES 4 U
Potato Prints
Material
* Potatoes * Water based Paint * Flat bottom container for paint * Paper
Instructions (ADULT Help required when cutting potatoes)
* Cut potato in half * Cut a design with a knife into the fresh cut part of potato * Dip potato in paint or lightly paint cut portion of potato * Stamp painted portion of potato onto paper * Repeat until desired pattern is created * Optional:
Repeat Cutting/Stamping with different colours
wrapping paper
Thanks Bethany for reminding me, Seligor xx
***************************
Things you can do with a few sheets of paper, poster paint and brushes, some straws a mega load of paper, which I'm sure the local chip-shop or Chinese Restaurant will provide you with the printless type. News paper makes an awful mess of everything. Don't forget the kitchen Roll and wet wipes.
*******************************
And now for the straws, quite runny paint and more wet wipes and kitchen roll. It often makes sense to paint outside on a lovely summer day when the paper doesn't blow away and the clothes can be taken off before painting begins. Jigsaws are excellent for winter :) :) :)
*************************
Put a blob of paint on the paper and using the straw blow the paint around
the page. You will need fairly thin paint so that it moves well around
the page. Supervision will be required for younger children to make
sure they don't suck paint through the straw.
**************************
Using
a shiny paper and a small brush, drop small blobs of paint onto the
surface. Tilt up the paper so that the paint runs down, with some being
absorbed on the way.
Above is a wonderful site that you can go to in Australia, It is excellent and has an awful lot of very good things to do.
PASTIMES 4 U
PASTIMES 4 U
Chicago Deep Dish Pizza
,
I'm Chef John Mitzewich for About.com, today I'm going to show you how
to put together the famous deep-dish, stuffed Chicago-style pizza.
Chicago Pizza Dough
All right, we're going to start with 1 1/2
pounds of pizza dough. You can buy that at the store or make it
yourself. Any recipe that makes enough for 2 pizzas will work. Divide
it not quite in half - like 55-45% because the bottom is going to be a
little bigger. So take the larger of the two pieces on a floured board
and roll it out about 1/8th inch thick.
Arrange the Pizza Dough in the Pan
I'm going to use a 10-inch
springform pan. So I want it about 4-5 inches larger than the pan.
Place it in and press it against the sides. Make sure it overlaps at
least an inch or so. Make sure its nice and form-fitting. A little
extra is fine because we are going to go around with scissors and trim
the extra. You can add that to the other dough.
Layer the Deep Dish Pizza Ingredients
We're going to throw in
1 cup of grated provolone cheese, 1 pound of cooked sausage, and I'm
going to put in a 10-oz can of artichoke hearts. The fillings are
really up to you. Top that with more cheese, 1/3 cup of grated Parmesan.
Add More Pizza Dough
Now to top that, roll the other piece of
dough to the same thickness and place that over the top. It's going to
overlap a bit. By the way, if that looks dark it's because I used whole
grain pizza dough. Trim again with the scissors. And then go around
with your finger tips and roll and press the top dough into the bottom
dough. Very simple. Don't worry too much about what it looks like
because when it bakes it will look beautiful.
Layer Chicago Pizza Ingredients on Top
Then take a parry knife
and poke some whole to release the steam. Top with 1 cup of pizza
sauce. Not to much, you don't want to weigh it down with sauce. Just
enough to cover it. Place 4-oz of fresh mozzarella cheese and about 1/4
cup of Parmesan.
Bake the Chicago-Style Pizza
Bake at 375 degrees F., for 45
minutes. It has to cook for a while so all that dough can cook and it
won't be all soggy. If you notice it getting too brown put some foil
over for the last few minutes of cooking. As soon as you can handle it
snap off the springform ring and use a spatula to remove the pizza from
the bottom and let it cool for at least 10 - 15 minutes.
Serve the Chicago Deep Dish Pizza
Then of course the good
part; slice it, serve it…look at that. Unreal, its so delicious. I'm
from New York so I love thin crust, but there is nothing like a good
thick stuffed Chicago-style deep-dish pizza for a change of pace. Hey,
you get like a free loaf of Italian bread going around the outside.
Really nice. I hope you give it a try. Enjoy.
More Things to Make
Have you ever made yourself a necklace out of macaroni, or a collage out of all different types of pasta. You only need a picture frame with a strong back that you can glue all the different pieces to it. and a hook with some string, and voila a wonderful Christmas present, that costs hardly anything.
To make your necklace, you will need any macaroni with a hole in the middle, and a piece of wool or string. It is best to paint the pieces of macaroni different colours first give them a wash and make sure they are quite dry, then thread the piece of wool through to make the neckless. Tie off. Voila!! beautiful Always use a piece of wool that will snap easily if tugged, we don't want you strangling yourself do we.
Mummy and Daddy would be very upset. So get them to help you choose which wool to use. Take a look at all the different colour pasta there is in these pictures, you will find hundreds of different ways of arranging them. Here are the letters of the alphabet, you can even teach yourself how to make words.
Remember the Tray Garden, well instead of moss and soil, use sand and pasta. The names of the different pasta's are revealed if you click on the pictures. Now for a few more for you to choose from.
 Kids will enjoy making this handy apron. All they have to do is dip their hands in paint and voilá, they've made a great
gift with their own "signature" on it.
Kids will enjoy making this handy apron. All they have to do is dip their hands in paint and voilá, they've made a great
gift with their own "signature" on it.


 PASTIMES 4 U IN SELIGOR'S CASTLE
 TABLE. I AM LUCKY TO HAVE A VERY BIG BACK GARDEN AND A LARGE FRONT ONE AND I HAVE SEVEN BIRD TABLES, AND I HAVE NO IDEA WHERE MY HUSBAND, PETER HAS OTHER THINGS SET UP.
 I HAVE A LOT OF GREY SQUIRRELS SO I MAKE PEANUT HOLDERS SPECIALLY FOR THEM WITH SOME OF THE COCONUT FLESH, IT DOES HELP KEEP THEM AWAY FROM ALL THE LITTLE
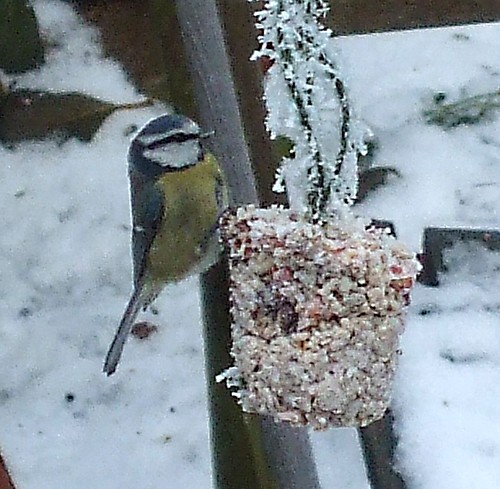


 Stumble It!


 Arrange the Pizza Dough in the Pan

 Bake the Chicago-Style Pizza