Seligor's Castle, fun for all the children of the world. Orange n Lemon
ORANGESANDLEMONS!!!
Riddles for Kids -With answers
1. Why are weary people like carriage-wheels?
—Answer: Because they are tired.
2. Spell "blind pig" in two letters?
--P G; A pig without an I.
3. Which bird can lift the heaviest weights?
—The crane.
4. Why may carpenters reasonably believe there is no such thing as stone?—
Because theynever saw it.
5. What is that which is put on the table and cut, but never eaten?
—A pack of cards.
6. What lives upon its own substance and dies when it has devoured itself?
—A candle.
7. Why is a dog biting his tail a good manager?
—Because he makes both ends meet.
8. What thing is it that is lower with a head than without one?
—A pillow.
9. Which is the left side of a plum-pudding?
—That which is not eaten.
10. If all the seas were dried up, what would everybody say?
—We haven't a notion (an ocean).
Seligor's Castle, would like to invite you to a fruit full of things,
to make and read with children in mind.
BUNCHES OF GRAPES.
"Bunches of grapes," says Timothy ;
"Pomegranates pink," says Elaine ;
"A junket of cream and a cranberry tart ;
"For Me," says Jane."
"Love in the mist," says Timothy ;
"Primroses pale," says Elaine ;
"A nosegay of pinks and mignonette
For Me," says Jane.
"Chariots of gold ," says Timothy ;
"Silvery wings," says Elaine ;
"A bumpy ride in a wagon of hay
For Me," says Jane.
From the pen of Walter De La Mare
Seligor's Castle,
would like to invite you to a fruit full of things to make with children in mind.
RASPBERRY APPLE CRISP
This is using "Google" and "Google Images" to the full. All the recipes are in the top image form and you can fine many different images for the actual dish. I find when I make any crumble or crispie that I make them in little dishes for picnics and parties and packed lunches also.
Of course I used to let the children fill there own dishes and even use different fruit if they don't all like raspberries or apples. Blueberries and pear is gorgeous. Anyway enjoy, I wont put them all on one page though, I will share them around the four web sites. The easier ones I will put in Diddilydeedot's Dreamland and so on. Have Fun Seli xxx
FROM ORANGES AND LEMONS EDWARD CAPERN (January 21, 1819 – June 5, 1894),
He was born at Tiverton, Devonshire, he was an English poet.
From an early age he worked in a lace factory. His failing eyesight
forced him to abandon this occupation in 1847 and he was in dire
distress until he secured an appointment to be "the Rural Postman of
Bideford," by which name he is usually known.
He occupied his leisure in writing occasional poetry
which struck the popular fancy. Collected in a volume and published by
subscription in 1856, it received the warm praise of the reviews and
many distinguished people.
This is one of his poems that was used in the "Boys' Third Standard," and it was published in 1873 though I am not sure of the exact date the poem was written, it is called;
THE BONNIE MAY.
Here she comes, the bonnie May, Sportive as a lamb at play, Beauteous as in days of yore, Welcome to the rich and poor; Nought is gloomy, sad, or drear, All is gladness everywhere. Village lads are up betimes, Waiting not for morning chimes, Leaving each his humble home, O'er the fresh green fields to roam.
See them one by one return, Raptures in their bright eyes burn, As the branch is borne along To the tune of ancient song, This the burthen of their lay, "Here she comes, the First of May." Now their little hands begin, Mid the shouts and merry din, Pretty wreaths and floral strings For their May-day offerings.
Round the Maypole, round and round, Men, and maids, and children bound ; Show'ring, as they halt between, Honours on their May-day Queen ; E'en the hamlet's oldest men Laugh, and feel they're young again, Shouting as each chaplet swings, Till the very welkin rings. Sadness hath no song for her, May 's the merriest of the year.
ROUND THE MAYPOLE, ROUND AND ROUND
Edward Capern is buried at Heanton Punchardon near Braunton, North Devon.
ORANGES AND LEMONS GIVES YOU :-
THE LITTLE PEAR GIRL
Once upon a time, a peasant worked hard to make a living from his land.
Every year his pear tree produced four basketfuls of fruit which had to be
given to the king, a greedy ruler who grew rich at the expense of the poor.
One year, part of the pear harvest went bad and the peasant was able to
pick only three and a half baskets of fruit. The poor man was beside himself
with fear, for the king refused to take less than four basketfuls, and the
peasant would be cruelly punished.
All he could do was put his youngest daughter into one of the baskets and
cover her with a layer of pears, so that the basket looked full. The king's
servants took away the four baskets without ever noticing the trick, and the
little girl found herself all alone in the pantry, under the pears.
One day, the cook went into the pantry and discovered her. Nobody could
understand where on earth she had come from, and not knowing what to do with
her, it was decided she should become a maid in the castle. Folk called her
Violetta, for her eyes reminded them of the colour of violets.
Violetta was a pretty girl, sweet and generous. One day, as she was
watering the flowers in the royal gardens, she met the king's son, a youth of
her own age, and the two became friends. The other maids, jealous of
Violetta's beauty and of the affection many people in the castle felt for the
girl, did everything they could to get her into trouble, by spreading nasty
rumours about her. One day, the king sent for her and said severely:
"I'm told you boast of being able to steal the witches' treasure trove.
Is
that true?" Violetta said 'no,' but the king refused to believe her and drove
her out of his kingdom.
"You may return only when you have laid hands on the treasure," he said.
All Violetta's fondest friends, including the prince, were sorry to hear of
the king's decision, but could do nothing to stop her going. The girl wandered
through the forest and, when she came to a pear tree, she climbed into its
branches and fell asleep. She was wakened at dawn by an old woman calling her:
"What are you doing up there, all by yourself?" Violetta told the old woman
her tale. She offered to help the little girl, gave her some round loaves, a
broom, a little oil and some good advice, and the girl again set off. She
reached a clearing with a large wood stove and saw three women tearing their
hair, using it to sweep the ashes from the stove. Violetta offered them the
broom and the women pointed out the way to the witches' palace.
Suddenly, two hungry mastiffs blocked her path. Violetta threw them the
loaves, the dogs ate them and let her pass. Then she came to the bank of a
river in flood, but remembering the old woman's advice, she sang:
Clear Sparkling River
Let me cross over, and the minute her song wafted into the air, the water stopped flowing.
Violetta thus crossed the river and at last reached the witches' palace. The
door was unlocked, but Violetta could not push it open for the hinges were
rusted. So she rubbed on a little oil and the door swung open. The little girl
walked through the empty halls till she came to a splendid room in which lay a
magnificent coffer full of jewels. Holding the coffer under her arm, Violetta
made for the door, but the coffer, being enchanted, cried out:
"Door! Don't let her out!" However, the door did open, for Violetta had
oiled the hinges. Down at the river, the coffer cried out. This time it said:
"Water! Drown her!" But the river did not stop the little girl from
crossing; the two mastiffs did not attack and the three strange women did not
burn her in their stove. For each, in its own way, repaid the girl's courtesy.
Back at the king's palace again, the prince ran happily to meet Violetta,
telling her:
"When my father asks you what you want as a reward, ask him for the basket
of pears in the pantry!" And this Violetta did. Pleased at paying such a
modest price, the king instantly ordered the humble basket to be brought. But
nobody ever imagined for a minute that underneath the pears lay the prince.
The young man came out of his hiding place, swore he was in love with Violetta
and that he wanted to marry her.
In this way, the king was forced to give his consent. Violetta brought her
family to court and they all began a new and happy life.
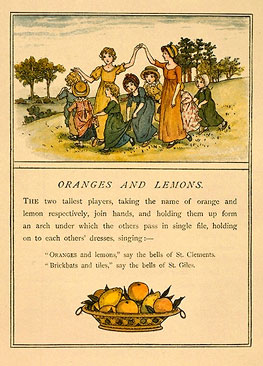
THE BELLS OF LONDON TOWN Gay go up, and gay go down, to ring the bells of London town. Bull's eyes and targets, say the bells of St. Margaret's.
Brickbats and tiles, say the bells of St. Giles. Halfpence and farthings, say the bells of St. Martin's.
Oranges and lemons say the bells of St. Clements. Pancakes and fritters, say the bells of St. Peter's.
Two sticks and an apple, say the bells of Whitechapel. Old Father Baldpate, say the slow bells at Aldgate.
You owe me ten shillings, say the bells of St. Helen's. Poker and tongs, say the bells of St. John's
Kettle and Pans, say the bells of St. Anne's. When will you pay me? Say the bells of Old Bailey.
When I grow rich, say the bells of Shoreditch. Pray when will that be? Say the bells at Stepney. I am sure I don't know, says the great bell at Bow. Here comes a candle to light you to bed, and here comes a chopper to chop off your head.
This I think is the complete rhyme of Oranges and Lemons and the Bells of London Town. .....
ORANGES AND LEMONS AND A BRAND NEW ALPHABET
A is an Apple round and Red. B is a Bunny tucked up in bed.
A. is and APPLE round and Red.
B is a BUNNY tucked upin Bed.
C is a CATERPILLAR out for a Walk.
D is two DOGGIES having a Talk.
E is an ELEPHANT drinking his Tea.
F is for FRANCES stung by a Bee.
G is for GEORGIE reading a Book.
H is the HEN that married the Rook.
I is the INK Jack spilt on the Floor.
J is the JACKDAW perched on the Roof.
K is the KITE that is flying so High.
L is the LADY who lives near By.
M for the MOUSE that chased Mrs Brown.
N is for NANCY shopping in Town.
O is the OWL that flies by Night.
P is the PEACOCK that gave us a Fright
Q is the QUACK-QUACK that swims on the lake.
R is the ROBIN that eat's Crumbs and Cake.
S is the SQUIRREL that lives in our Tree.
T is the TRAIN that brings YOU to ME.
U is our UNCLE so kind and so Sweet.
V is for VERA so trim and so Neat.
W is for Willie Worm who crawls on the Ground.
X is a letter that's not often find.
Y and Z are LETTERS I dread So if you'll allow me I'll put them to Bed
I wonder how many of you can tell Mum and Dad
what all the pictures are about, love Seligor
When life hands you lemons, make the Taj Mahal
A group of Indian dancers perform in front of a replica of the Taj
Mahal, made of lemons and oranges, at the 74th Lemon Festival in
Menton, southeastern France, February 17, 2007.
All made out of Oranges and Lemons.
Cassie's Pink Lemonade with Dragon-berries
What You'll Need:
1 can pink lemonade drink orange juice blueberries for garnish 1/2 lemon (optional)
>How to Make It:Fill an ice tray with orange juice.
Put two or three blueberries in each compartment and put in freezer. Make
lemonade according to directions on can.
If desired, squeeze half a
lemon into the pitcher for an even fresher lemonade taste. When ready to serve, put several "dragonberry" ice cubes in each glass.
For extra fun, serve with a colorful or twisty straw.
COOKERY TIME FOR CHILDREN
LEARN TO COOK WITH SELIGOR'S FRIENDS ON YOUTUBE
ORANGESANDLEMONS Another new page for you to have fun with let's start with a rousing Rhyme "Oranges andLemons" say theBells of St. Clement's
"You owe me five farthings" say the Bells of St. Martin's
"When will you pay me?" say the Bells of Old Bailey
"When I grow rich" say the Bells of Shoreditch
"When will that be?" say theBells of Stepney
"I do not know" say the Great Bells of Bow
"Here comes a Candle to light you to Bed,"
"Here comes a Chopper to Chop off your Head."
"Chip chop, chip chop - the Last Man's Dead."
Please try and visit the Victoria and Albert Museum of Childhood, it is fantastic. www.vam.ac.uk/.../oranges_&_lemons/index.html
I WOULD LIKE TO THANK THE
Back-to-School Bake Sale at www.chow.com/
http://www.chow.com/recipes/12130
Classic schoolyard treats
Shortbread Lemon Bars
The appeal of lemon bars is easy
to understand: When well made, the buttery shortbread crust
and the intensely tart lemon-curd filling are irresistible. Here we’ve left off the standard dusting
of powdered sugar, but if you desire a touch of extra sweetness, feel free to indulge.
This recipe was featured as part of our Back-to-School Bake Sale story.
INGREDIENTS
2 cups plus 3 tablespoons all-purpose flour 3/4 cup powdered sugar 1 teaspoon salt 2 sticks (8 ounces) cold unsalted butter, cut into small pieces 1 3/4 cups granulated sugar 6 large eggs 3/4 cup freshly squeezed lemon juice (from 5 medium lemons) 2 teaspoons finely grated lemon zest (from 1 medium lemon)
INSTRUCTIONS
Heat the oven to 350°F 180°C and arrange a rack in the middle. Coat a 13-by-9-inch baking dish with butter; set aside. Place 2 cups of the flour, the powdered sugar, and 1/2 teaspoon of the salt in the bowl of a food processor
fitted with the blade
attachment, and pulse briefly to combine. Scatter butter pieces over
flour mixture,
and pulse until dough just begins to come together,
about 20 (1-second) pulses. Crumble dough into the prepared baking dish and, using the base of a measuring cup
or a glass dipped in flour,
press evenly into the pan. Bake until crust
is fully set and just starting to brown on the edges, about 25 minutes.
Remove from the oven and let cool while you make the filling, at least
5 minutes.
Reduce the oven temperature to 325°F. To make the filling, combine remaining 3 tablespoons flour, remaining 1/2 teaspoon salt, granulated sugar,
and eggslemon juice and zest, and whisk until well combined. Add in a large bowl and whisk until sugar is dissolved and mixture is smooth, about 2 minutes. Pour
filling over baked crust, return to the oven, and bake until set, about
25 to 35 minutes.
Remove from the oven and let cool on a wire rack. Cut
into squares and serve.
Snickerdoodles
Total: 1 hour
Active: 30 mins
Makes: 44 cookies
Snickerdoodles, buttery cookies rolled in cinnamon-sugar, are a staple at bake sales and holiday gatherings. Their characteristic sour note comes from cream of tartar, which before the advent of baking powder was used in
conjunction with baking soda as a leavening agent.
This recipe was featured as part of our Back-to-School Bake Sale story.
INGREDIENTS
1 1/2 cups granulated sugar 1 tablespoon ground cinnamon 2 cups all-purpose flour 2 teaspoons cream of tartar 1 teaspoon baking soda 1/2 teaspoon salt 12 tablespoons unsalted butter (1 1/2 sticks), at room temperature 2 large eggs, at room temperature 1 teaspoon vanilla extract
INSTRUCTIONS
Heat the oven to 350°F 180°C and arrange a rack in the middle. Combine 1/4 cup of the sugar and the cinnamon in a small bowl, and mix until evenly combined; set aside. Combine flour, cream of tartar, baking soda, and salt in a large bowl, and whisk to aerate and break up any lumps;
set aside. Combine butter and remaining 1 1/4 cups sugar in the bowl of a stand mixer fitted with the paddle attachment,
and beat on medium speed until light and fluffy, about 2 minutes. Add eggs and vanilla, and continue beating until eggs are fully incorporated. Scrape down the sides of the bowl, and add flour mixture. Mix on low speed until fully incorporated,
about 20 seconds. Form tablespoon-size balls of dough with your hands and roll them in the cinnamon-sugar mixture. Place on a baking sheet about 1 inch apart. Bake cookies until golden brown and crackly on top but still soft in the middle, about 11 minutes.
Immediately remove from the baking sheet and cool on a rack. Repeat with remaining dough.
Double Marshmallow Puffed Rice Treats
TIME/SERVINGS
Total: 15 mins, plus cooling time
Despite what certain cereal ads may have you think, we stand by the
belief that the best part of these treats is the marshmallows.
So we added in way more, but to maintain the right texture,
we folded
some in at the end to keep them whole and the treats crunchy.
Game plan: The treats will last up to 3 days when covered and stored at room temperature.
This recipe was featured as part of our Back-to-School Bake Sale story.
INGREDIENTS
11 cups miniature marshmallows 8 tablespoons unsalted butter (1 stick), plus extra for buttering the spatula and dish 8 cups puffed rice cereal, such as Rice Krispies
INSTRUCTIONS
Coat the bottom of a metal spatula and a 13-by-9-inch baking dish with butter; set aside. Combine 8 cups of the marshmallows and the butter in a medium pot and cook over medium-low heat, stirring frequently, until melted and smooth, about 8 minutes. Remove
from heat and stir in cereal until well coated. Add remaining 3 cups marshmallows and stir just until mixed. Immediately turn mixture into the prepared baking dish and use the buttered spatula to uniformly flatten. Let set up until room temperature and firm, about 45 minutes. Cut into 15 (2-1/2-inch-by-2-1/2-inch) squares and serve.
Peanut Butter–Chocolate Fudge
Total: 15 mins, plus cooling time
Active: 15 mins
Makes: 25 squares
This fudge combines the saltiness of peanut butter with the complexity of
chocolate for a simple sweet that’s a crowd-pleaser.
What to buy: We used 60 percent cacao bittersweet chocolate chips from Ghirardelli.
They have a deep chocolate flavour and make this fudge even easier, because no chopping is necessary
.
Game plan: The fudge will last up to 10 days when stored covered in the refrigerator.
This recipe was featured as part of our Back-to-School Bake Sale story.
Coat an 8-by-8-inch baking dish with butter and set aside. Combine milk, chocolate chips, and marshmallows in a medium saucepan over medium heat.
Cook, stirring constantly, until mixture is melted and smooth, about 5 minutes. Remove from heat and mix in peanut butter and vanilla extract until thoroughly combined. Turn into the prepared baking dish, spread out evenly, and let cool to room temperature, about 10 minutes. Cover and place in the refrigerator until firm, about 1 hour. Cut into 25 squares and serve.
Vanilla Bean Cupcakes
Total: 40 mins
Active: 20 mins
Makes: 24 cupcakes
By Amy Wisniewski
Addictive even on their own, these tiny, vanilla-infused cupcakes are thoroughly irresistible when slathered with
Salted Caramel Frosting. Whip some up for your next birthday party; they’ll appeal to both adults and kids.
This recipe was featured as part of our Back-to-School Bake Sale story.
INGREDIENTS
2 cups cake flour 2 teaspoons baking powder 2 teaspoons kosher salt 12 tablespoons unsalted butter (1 1/2 sticks), at room temperature 1 1/2 cups granulated sugar 1 vanilla bean, split lengthwise and scraped, seeds reserved (or 1 tablespoon vanilla extract) 2 large egg whites, at room temperature 2 large eggs, at room temperature 3/4 cup whole milk, at room temperature Salted Caramel Frosting
INSTRUCTIONS
Heat
the oven to 350°F 180°C and arrange a rack in the middle. Line 2 (12-well)
muffin pans with paper liners.
Alternatively, coat the wells with
butter; set aside. Combine flour, baking powder, and salt in a medium bowl and whisk to aerate and break up any lumps; set aside. Place butter in the bowl of a stand mixer fitted with the paddle attachment and beat on medium-high speed until
very light in color, about 3 minutes. Add sugar and vanilla seeds (if you’re using vanilla extract instead,
you’ll add it later), and continue beating until mixture is airy, about 3 minutes. Scrape down the paddle and the sides of the bowl, turn the mixer to medium speed, and add egg whites one at a
time, beating well after each addition. Then add eggs one at a time, beating well after each addition. Add milk (and vanilla extract, if you’re using it in place of seeds), and mix until combined (the mixture will look
curdled, but it’s not).
Scrape down the sides of the bowl. Reduce speed to low, add flour
mixture, and mix until just combined, about 15 seconds. Fill the muffin wells about halfway, and bake cupcakes until golden brown and a toothpick
inserted in the center
comes out clean, about 18 minutes. Set the pans
on a wire rack and let cool for 5 minutes. Remove cupcakes
from the
pans and let cool completely before frosting.
Nutty White Chocolate Blondies
Total: 35 mins, plus cooling time
Active: 10 mins
Makes: 18 bars
By Amy Wisniewski
Blondies—named for their color—are the underappreciated cousin of brownies.
Their butterscotch flavor is more subtle than that of anin-your-face cocoa brownie, but they are just as easy to make.
We’ve also added toasty nuts and white chocolate,for a treat that’s begging for an accompanying scoop of vanilla ice cream.
What to buy: Be sure to pick up good-quality white chocolate chips,
because the cheaper ones are usually waxy and filled with artificial
flavors. If you don’t enjoy white chocolate, swap in your chocolate or
butterscotch chip of choice.
This recipe was featured as part of our Back-to-School Bake Sale story.
INGREDIENTS
12 tablespoons unsalted butter (1 1/2 sticks), melted 1 1/3 cups packed light brown sugar 4 teaspoons vanilla extract 2 teaspoons salt 1 teaspoon baking powder 2 large eggs, at room temperature, lightly beaten 1 1/4 cups all-purpose flour 1 cup nuts, such as pecans or walnuts, toasted and coarsely chopped
1 cup white chocolate chips
INSTRUCTIONS
Heat the oven to 180°C 350°F and arrange a rack in the middle. Coat a 13-by-9-inch baking dish with butter a
nd flour; set aside.
Combine butter and brown sugar in a large bowl and stir until evenly incorporated. Add vanilla, salt,
and baking powder, and stir until thoroughly combined. Add
eggs, and stir briefly until evenly incorporated. Add flour, and stir
until just incorporated
(no white streaks should remain). Stir in nuts and chips until just combined.
Transfer
batter to the prepared baking dish, and bake until golden brown and
set, about 25 minutes.
Remove from the oven and place on a wire rack to
cool completely before cutting.

 "Bunches of grapes," says Timothy ;
 "Chariots of gold ," says Timothy ;


 "Door! Don't let her out!" However, the door did open, for Violetta had
oiled the hinges. Down at the river, the coffer cried out. This time it said:
"Door! Don't let her out!" However, the door did open, for Violetta had
oiled the hinges. Down at the river, the coffer cried out. This time it said:


 A
A


 I
I 
 K
K L
L


 P
P Q
Q

 T
T U
U V
V W
W